
Livecode Tutorial
Learn Livecode: the Easiest, Most Productive Multi-Platform Development Tool
By: Nick Antonaccio
All example apps can be downloaded from http://live-code.net/examples
Updated 12-19-2016
Contents:
1. Introduction1.1 Download
1.2 How it Works
2. Getting Started
3. A Complete App: Digital Birthday Card
4. Creating a Stand Alone App
5. A Sliding Tile Puzzle App
6. A Generic Calculator App
7. A Tip Calculator App
8. A To-Do List App
9. A Click/Drag Matching App
10. Arrays, Loops, Chunks and Other Data Processing Tools
10.1 Arrays
10.2 Loops
10.3 Chunks and Text Manipulation
10.4 Conditional Evaluations
11. A '99 Bottles of Beer on the Wall' App
12. A Pig Latin App
13. A Madlib App
14. A 'Time Between Dates' App
15. A Cash Register App
16. An HTML Calendar Generator and Viewer App
17. A Freehand Paint App
18. A Coin Flip App
19. A Network Message Sender App
20. Learning To Create New Apps
20.1 Prototyping and Pseudo Code
21. Case Studies
1. Introduction
Livecode is a "RAD" (Rapid Application Development) system which enables you to create apps for desktop (Windows, Mac, Linux), mobile (Android, iOS), web (HTML5/Javascript/CSS), and other platforms (Raspberry Pi, web server, etc.). Livecode is the easiest to use of all professional RAD systems, yet it's deeply powerful. Its English-like language and straightforward IDE make Livecode orders of magnitude faster to learn, and far more productive than other well known development environments (Java, C#, C++, Python, Ruby, Javascript, PHP, Basic, Lua, Clojure, etc.). Kids can create complete interesting apps within their first day learning to code. Professionals can use it to dramatically increase output in a wide range of application domains, for virtually every type of computing device/platform in common use. You can see examples of significant enterprise projects completed with Livecode at https://livecode.com/studies/.
In this tutorial you'll learn the most important principals of the Livecode language and IDE by building 30 varied apps. The entire tutorial should take less than an hour to read, and just a few hours to complete if you actually create every example in Livecode as you go.
1.1 Download
Download the free open source "Community" version of Livecode from:
You can start learning, and make apps for your own personal use, with the open source version of Livecode. It's totally free and completely functional. You only ever need to pay for a license if you want to keep your distributed source code closed (secret), or use your apps for commercial (business/money making) purposes.
1.2 How it Works
Building an app with Livecode is simple:
1) Open Livecode and create a new 'stack' (apps are called stacks in Livecode):
2) Drag 'controls' (gadgets/user interface components) onto the default 'card' (window/screen) in the stack.
3) Add more sub-stacks, cards, controls, etc, as needed to build the 'UI' (graphic User Interface) of your app.
4) Write code (scripts) using the 2000+ commands, event handlers and properties built into the Livecode language, to give functionality to your app.
Scripts are generally attached to controls, cards, stacks, and other visual objects which make up the UI of your app, and code is generally organized within 'handlers' for events which occur in your app. For example, adding this bit of "on mouseUp" handler code to the script of a button in your app's UI, will make the app beep whenever that button is clicked:
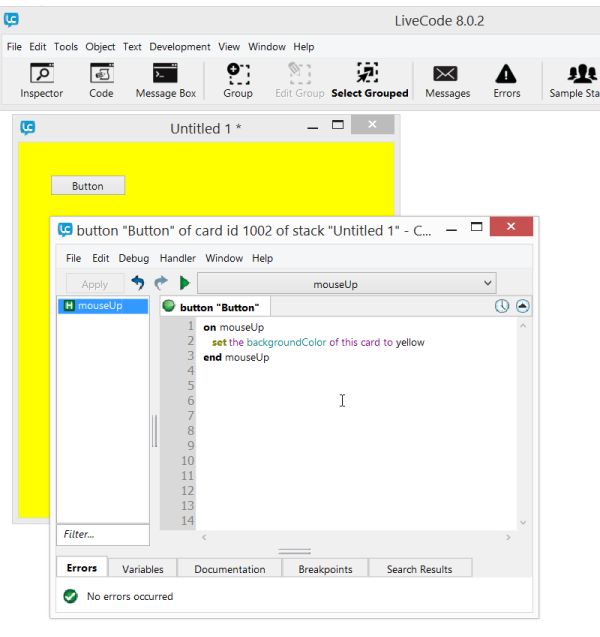
on mouseUp
    beep
end mouseUp
Every 'object' in Livecode (control, card, stack, etc.) has a wide variety of 'properties' which can be edited manually in the Livecode 'IDE' (Integrated Development Environment (the main Livecode program)), by pointing and clicking, or by setting property values with code. For example, you can set the background color of a card by clicking a color selector in the IDE, or by writing a line of code in your program which sets the color value.
Likewise, you can set the text value displayed in a text field control, change the image displayed in an image control, set columns of data displayed in a table control, etc. by either manually clicking and editing properties in the IDE, or by setting those properties with code. Any property setting which can be adjusted manually in the IDE can just as easily be adjusted with code, and visa-versa.
Livecode's built in 'message handlers' provide the ability to respond, in code, to any possible event which can occur to any object in your app's visual layout. They make it simple to write code which can handle anything a user can do to interact with your app, or to handle any event/condition/situation which can arise within your app.
Not only are there a huge variety of message handlers built into the Livecode language, there are an even wider variety of 'commands' and 'functions' which can perform useful actions in response. There are commands to send emails, to edit images, to play and process sounds, to send and receive data to/from network ports, databases and web servers, to parse and organize large tables (columns and rows) of information, etc.
The built-in Livecode dictionary makes it easy to look up every word, handler, and structure in the environment.
Livecode's 'container' concept makes it equally easy to store/retrieve data in local files, web URLs, UI controls (text fields, grids, etc.), 'variables' (word labels you create in code), etc. Livecode's 'chunk' language allows you to easily access/change specific pieces of data (lines, words, characters, delimited text, etc.) within any container or data structure (lists, nested tables, etc.). A wide variety of built in controls and interfaces such as Livecode's grid, camera tools, database features, etc. make it easy for users to interact with complex data.
While building a Livecode app, you can switch back and forth instantly between editing and running code (hence the name 'Livecode'), and there's a message box in the IDE which lets you test and run small pieces of code, so that you can formulate bits of script which make up the actions of your app, as you go.
More than any other programming language, Livecode is easy, intuitive, consistent, and naturally English-like to learn and use. You'll find that many Livecode scripts can be understood immediately, even if you've never seen any code before. You can accomplish in days what would require months using other tools, and many difficult to achieve goals feel like child's play in Livecode. If you're an experienced developer, you'll be amazed at just how intelligently organized, pleasant to use, and dramatically productive the entire Livecode environment and tooling system is.


2. Getting Started
In this tutorial you'll learn by building apps. New commands, code structures, controls, techniques and concepts will be introduced as they're needed to create apps with new features.
Start by opening Livecode and creating a new stack (File -> New Stack -> Default Size).
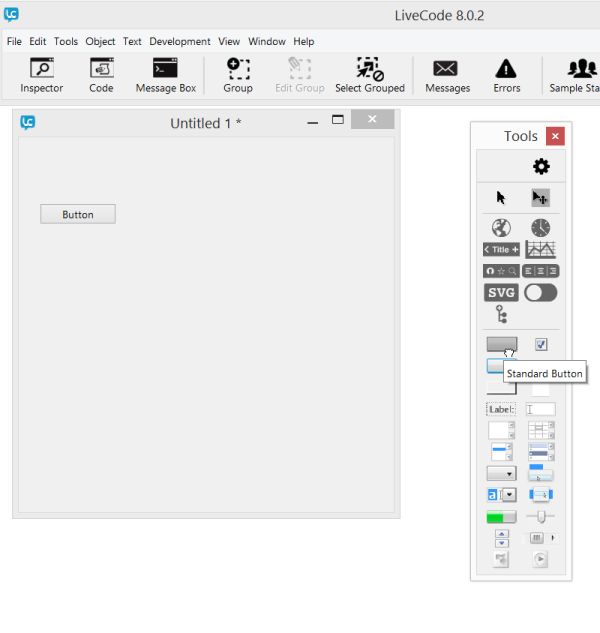
Drag a button from the Livecode toolbar which runs vertically up the side of your screen, onto the default card of your new stack. Make sure the button control you just added is selected (outlined by a dotted line) in your stack, then click 'Code' in the Livecode toolbar which runs horizontally across the top of your screen.
You'll see that 2 lines of default "on mouseUp" handler code have been added for you. On the empty line between the start and end lines of the mouseUp handler code, type "beep".
Click the 'Apply' button, then click the 'Browse' tool in the vertical Livecode toolbar (the top left arrow icon in the toolbar).
Your app is now running. Click the button in your app, and a system beep will sound.
"Beep" is a command which is built into the Livecode language. In the example above, we made it run whenever a 'mouseUp' event occurs on the button. We can run other commands the same way. Click the 'Pointer' tool in the Livecode toolbar on the left side of your screen (right next to the 'Browse' tool at the top of the toolbar), to go back into editing mode.
If you've typed anything incorrectly, the Livecode debugger will pop up with the error line highlited, and a message explaining what's wrong. Click the blue button in the code editor, make any necessary changes to the code, and click apply to continue.
Now drag another button from the toolbar to your stack, click the 'Code' icon above, and add the 2 script lines below, between the 2 default lines of "on mouseUp" handler code:
ask "Type something:"
put it into the message box
"Ask" is a command which requests some input from the user. Whatever the user types in response is saved in the 'variable' "it". "Put" is a command which moves data into various containers in the Livecode environment. In the example above, the text entered by the user is put into Livecode's built-in message box, so the user sees what they've just typed, echoed back in the message box. Click the 'Apply' button in the code window, click Livecode's 'Browse' tool to run your app, and click your app's new button to see the code in action.
Livecode has a number of shorthand code variations for common routines. The code below does the exact same thing as the lines above:
ask "Type something:"
put it
Now erase the code above and replace it with this:
ask "What is your name?"
put ("Hi " & it & "!") into the message box
The ampersand symbol (&) is used to 'concatenate' (join) pieces of text together. In the example above, the text entered by the user, combined with the default text "Hi" and an exclamation point, is put into the message box, so the user sees a welcoming message pop up when the process is complete. That whole joined together bit of code is enclosed in parentheses to clarify that it's a discrete unit. The parentheses aren't required here, but help ensure that that part of the code is treated as an isolated expression. It's a good idea to get used to doing this in longer, more complicated lines of code. Click 'Apply', and click 'Browse' in the toolbar to run the new code, then click the 'Pointer' took in the toolbar to go back to edit mode. Instead of clicking 'Apply', you can alternately simply close the edit window, and the keyboard shortcut keys CTRL + 9 to run the code, and CTRL + 0 to go back to edit mode.
Now drag another button onto your app, and add the following code to that button's 'on mouseUp' handler. You can click the 'Code' icon, or use the shortcut keys CTRL + E to open the code editor more quickly:
answer "Favorite color:" with "Red" or "Blue" or "Green"
revSpeak (it & " is a great color!")
The 'answer' command pops up a message with up to 7 optional button choices for the user to select. The answer chosen by the user is stored in 'it', just as with the 'ask' command. The 'revSpeak' command pronounces quoted text using a synthesized voice. In the example above, the choice selected by the user is combined (using the ampersand symbol) with some static text, all of which is spoken aloud. Apply and run the code to see it work, then go back to edit mode.
Now drag a text field control from the tool bar onto your app. Make sure the text field stays highlighted, and click the "Inspector" icon in the horizontal Livecode toolbar on the top of your screen, or simply double click the field control to edit its properties. Change the 'Name' property of the field control to "field1" (Livecode is case insensitive, so it doesn't matter if you capitalize or not).
Now add another button, with these lines of code in the 'mouseUp' handler:
put the date into field "field1"
put (" " & the time) after field "field1"
put "It's now: " before field "field1"
Notice how the words "into", "after", and "before" affect where the text is put in the field. Now run your app to see it work.
You can also use "put" to create 'variables', which are word label containers used to store data for later use in your app. Add a new button to your app, with this 'mouseUp' code:
ask "Type some text:"
put it into myVar
ask "Type some more text:"
put it after myVar
ask "Type a third bit of text:"
put it before myVar
put myVar into field "field1"
Note that 'myVar' in the code above is a totally arbitrary label, and could be replaced with any other arbitrary word you make up. There are some limited rules about how variables are named in Livecode, mostly related to avoiding conflicts with other words used by the Livecode system . If you stick with uninterrupted strings of letters beginning with "my", you'll generally be safe for now. Variable labels are typically chosen to represent the information they hold in your app. In a game, you may choose to label the score and high score variables "score" and "highScore", for example. In a quick math script you might choose to label some variables "x", "y", and "z". In Livecode, you create a variable simply by 'put'ing a value into a new word determined by you.
Seeing more commands and language syntax put to use like this is all it takes to learn how to program in Livecode. As you see more code, you'll recognize repeated patterns of language use, as well as repeated working techniques, and creating apps will quickly become an intuitive process.
You can experiment with small bits of code by clicking the Livecode "Message Box" icon. Type 'revSpeak "This is awesome!"' into the Message Box and try playing with some more variations of the code examples from this section. You can actually refer to properties of controls in your stack, and make changes to your app, directly in the message box.
Experiment by dragging other controls onto your app to see how they look, play with the drawing tools, try edit features such as undo, redo, etc., to get to know the environment a bit more.
If you'd like to clear the clutter on your screen, try closing the Livecode tools palette. You can re-open it any time with the shortcut keys CTRL + T, or by selecting Tools -> Tools Palette in the main Livecode menu.


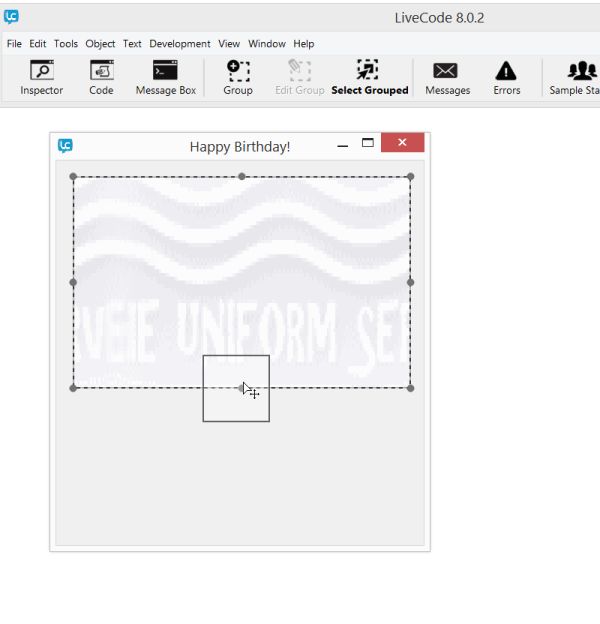
3. A Complete App: Digital Birthday Card
Create a new stack and click Livecode's Inspector icon to edit the stack's properties (you can also just double click the stack, or any other object, to bring up its property inspector). Set the 'name' and 'title' properties of the stack to "Happy Birthday".
In the main Livecode menu, select Object -> New Card. This adds another new window (empty screen) to your app. You can navigate between cards by selecting View -> Go First (Go Last, Go Next, etc.) from the main Livecode menu. Navigate to the first card and double click it (or click the Inspector icon) to edit its name property to "card1".
Drag an image control onto card1 and edit its 'Source' property to the name of any image file on your computer. You can click the '...' button to browse and select an image from any folder on your machine.
If you don't have a desirable image to use, try downloading one from Google, save it into a folder which you can easily locate, and then select it in Livecode. Set the 'Resize quality' property of the image to "best".
Position your image by dragging it near the top left corner of the card/stack, and grab the handles around the image edges to stretch it as you see fit.
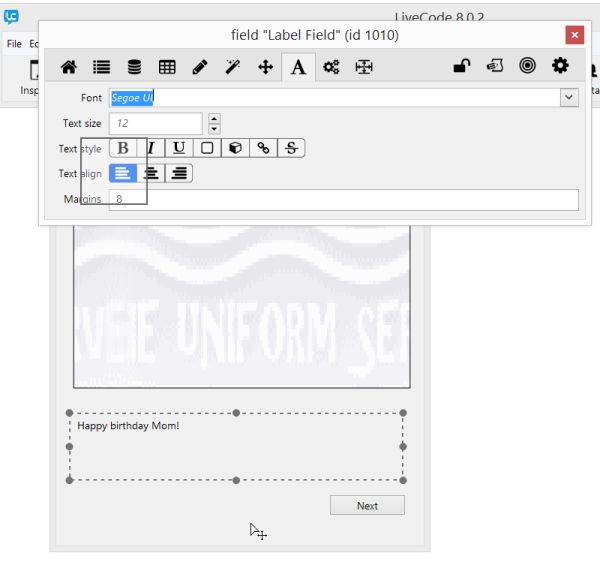
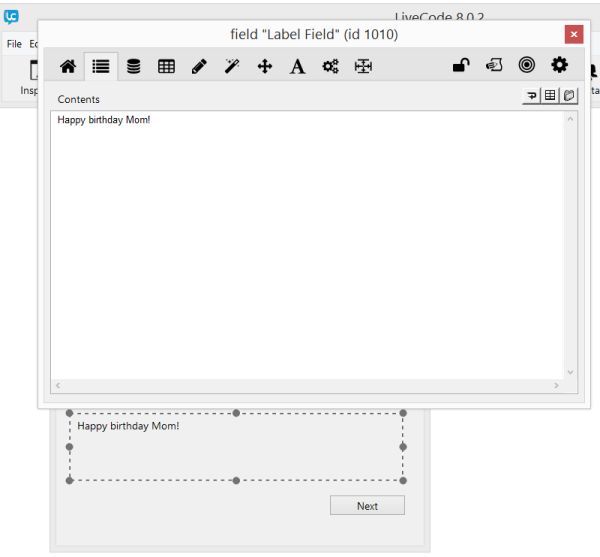
Drag a label control onto your stack just below the image. Resize it wide enough to stretch most of the way across the stack, and tall enough to display several lines of text. Double click the label to edit its properties, click the 'A' tab icon (eighth from the left), and select the Left (first) 'Text Align' icon. Click the 'Contents' tab (second from the left) and type in some text such as "Happy Birthday Mom!"
Drag a button onto the bottom right hand corner of the card and set its 'name' and 'label' properties both to "Next".
Add the following code to the button's 'on mouseUp' handler (remember the CTRL + E keyboard shortcut):
on mouseUp
   visual effect push left
   go to next card
   revSpeak "Happy birthday!"
end mouseUp
This code sets a 'visual effect' (animated transition) to be applied when moving between cards, then switches to the "card2" screen and speaks "Happy birthday!" aloud.
Now switch to card2, and as you did with card1, add an image, a resized left justified label, and a button to the second card. Choose any image you want, edit the label field's text to something like "You're the greatest! Love, your son". Set the 'name' and 'label' properties of this button to "Previous", and add the following code to its 'on mouseUp' handler:
on mouseUp
   visual effect dissolve
   go to card "card1"
end mouseUp
You can learn about all the available visual effects in Livecode by clicking Help -> Dictionary (API) in the main menu, and then searching for "visual effect". You'll use the dictionary constantly to look up details about commands, handlers, properties, etc. It is the single most important reference tool available for Livecode.
Save this stack (File -> Save in the main menu) and click the pointer tool (or use the shortcut keys CTRL + 9) to run the app.
Can you imagine some other ways to use the techniques in this app for other purposes? For example, you could create a presentation, a 'choose your own adventure' story, an audio/visual book (even one which reads aloud to you), etc., with nothing more than what you've learned so far.


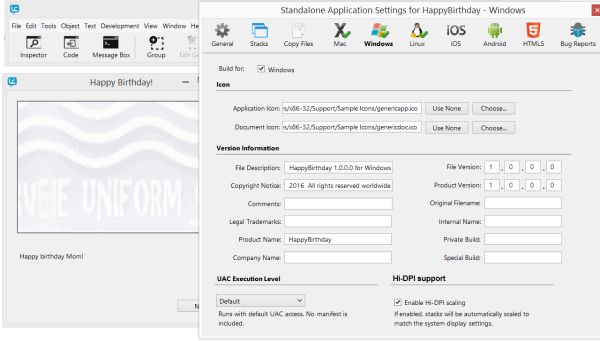
4. Creating a Stand Alone App
To create a stand-alone app from a Livecode project (one that can run outside of the Livecode environment), click File -> Stand Alone Application Settings, and select the platforms which you'd like to build for (Mac, Windows, Linux, etc).
Stick with desktop OSs for now, as Android and iOS mobile platforms require the download, installation, and configuration of significant third party tools. Click File -> Save Stand Alone Application, choose a folder, and a fully functional stand alone app will be created for every platform you've selected. You can run the app, email it to people, upload it to a web server for distribution, submit it to an app store, etc. Note that you can 'cross-compile' between platforms - build Mac apps on Windows, Linux apps on Mac and visa-versa, Android apps on any desktop platform, etc. - all using the exact same code! Try sending a stand-alone birthday card to someone you care about.
5. A Sliding Tile Puzzle App
Create a new stack and edit the stack's properties (click the Inspector icon, or double click the stack, or you can also select Object -> Stack Inspector in the main Livecode menu). In the first property pane, set the 'name' and 'title' properties to "Tile Game". Now select the 5th property pane (click the icon which looks like a plus sign made of arrows), and change the 'width' and 'height' properties both to 300.
Drag a button onto the stack and set its 'width' and 'height' properties both to 100, its 'left' and 'top' both to 0, and its 'name' and 'label' properties both to "1".
Drag another button onto the stack and set its 'width' and 'height' properties both to 100, its 'left' and 'top' both to 200, its 'name' to '9', and its 'label' property to " " (so that no text is displayed on the face of the button - this will be the empty space into which numbered tiles are moved).
Now add the following code to the first button's 'mouseUp' handler:
put the loc of me into temploc
set the loc of me to the loc of button "9"
set the loc of button "9" to temploc
You can see in the code above that a new variable called "temploc" is created to hold "the loc of me" value. The 'loc' property holds an object's center location coordinate. The 'me' word is a shorthand way for an object to refer to itself (in the code above, 'me' could be replaced with 'button "1"'). The 'set' command allows you to set any property of any object to any value. First, the location of button 1 is set to that of button 9, then the location of button 9 is set to the original location of button 1 (previously stored in the 'temploc' variable). This has the effect of swapping the two buttons on screen.
To create the rest of the tile game app, we need to add 7 more buttons labeled "2"-"8". Hold down the CTRL key on your keyboard while dragging your mouse over button 1, and copies of that button will be instantly created (you can also use the shortcut keys CTRL + C and CTRL + V to cut and paste object copies). Set each new button's size to 100 and its coordinate properties to fill up the empty card layout:
Instead of copying the code from button 1, however, add this code to the 'mouseUp' handler of each button:
movetileTo get to the main stack's code window, click Tools -> Project Browser, and click the "0" on the right side of the "Tile Game" line. Add this code to the 'mouseUp' handler of the main stack:
on movetile
   put the loc of the target into temploc
   set the loc of the target to the loc of button "9"
   set the loc of button "9" to temploc
end movetile
This block of code is called a 'user command', which we've labeled 'movetile'. Just like Livecode's built in commands, user commands accomplish some action(s). Once defined, a user command can be called using the word label you give it, just like any built-in command you've seen so far. They're simply created using a label and some code you define. When you want to use a section of code many times in many places in your app, user commands are the solution. Remember, we've already added the 'movetile' command to all the rest of the buttons in our game, so that code runs any time any of those buttons is clicked.
Notice the use of 'the target' in the code above, instead of 'me'. Because this code lives in the main stack script, 'me' would refer to the stack, rather then to the button which called the command. 'The target' ensures that the location property of the button which called the 'movetile' command is changed, rather than the location of the stack.
Save this stack, try playing the tile game a bit, and perhaps experiment with changing the color, font size, and other properties of the buttons to familiarize yourself more with the available options.


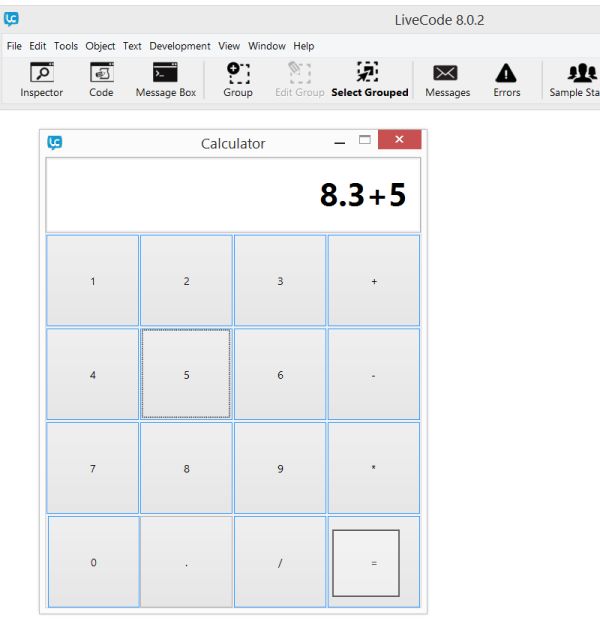
6. A Generic Calculator App
Create a new stack and edit its 'name' and 'title' properties to "Calculator". Edit its 'width' and 'height' properties to 400 and 480.
Drag a text field control onto the stack and edit its 'name' property to "Display". Edit its 'width' and 'height' properties to 80 and 400, and its 'left' and 'top' properties both to 0.
Drag a button control onto the stack. Edit its 'width' and 'height' properties both to 100, and its 'left' and 'top' properties to 0 and 81. Add the following code to the button's 'on mouseUp' handler. You can get to the script editor by clicking Livecode's 'Inspector' icon or by using keys CTRL + E, as you've seen previously, or alternately by clicking on the little 'Edit Script' icon directly in the properties screen (3rd from the right, it looks like a pen and paper):
on mouseUp
   addToDisplay
end mouseUp
That code calls a custom 'addToDisplay' command, which we need to create. You can get to the stack script using the object inspector (as explained previously), or alternately by clicking the bullseye icon in the property inspector and selecting Inspect -> Stack -> Calculator, then clicking the 'Edit Script' icon. Add the following code to the stack script:
on addToDisplay
   put the label of the target after field "display"
end addToDisplay
This code is similar to the stack script you saw in the Tile Game example. It adds the text label of any button clicked by the user, to the end of the 'Display' field. Remember, whichever button executes this command is referred to as "the target". Notice that the word "after" is used to join the button's label text to the end of the 'Display' field.
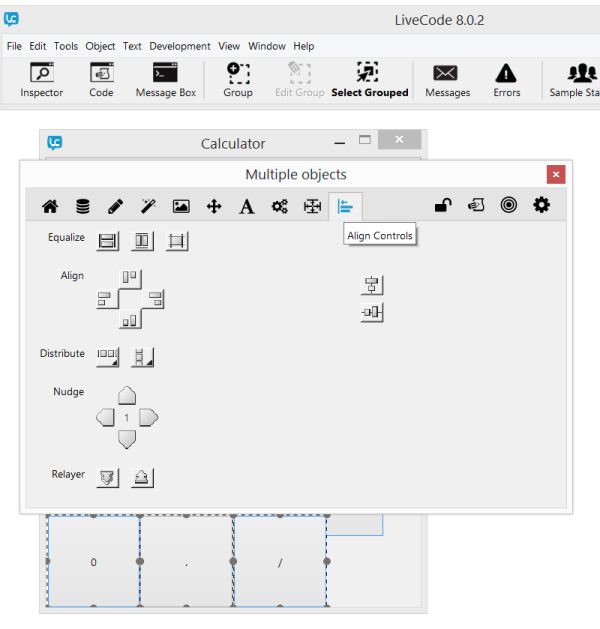
Now create 15 more copies of the button control above. You can select the button and hold the CTRL key on your keyboard, or use the Edit -> Copy Objects/Paste menu option (or the CTRL + C/V shortcut keys) to quickly make all the copies. Edit the label properties of each button to "1, 2, 3, 4, 5, 6, 7, 8, 9, 0, +, -, *, /, ., =", and arrange them on screen as in this image:
To precisely recreate the layout above, you could edit the location properties of each button, or you could try to painstakingly drag, drop, and visually align each button, but Livecode provides a better method. When you select multiple objects in the UI with your mouse, then click Livecode's inspector icon, you'll see a new tab appear in the object inspector called 'align controls'. In this tab, the 'equalize' tool resizes selected objects equally, the 'distribute' tool distributes the positions of selected objects equally across the screen, and the 'align' tool lines up selected objects along a straight vertical and/or horizontal line.
Spend some time familiarizing yourself with these tools - you'll use them often to lay out UI controls. Tip: when aligning the bottom row of calculator buttons in this example, move the "=" button elsewhere, so that you have some empty space on the card to begin selecting the last row of multiple buttons. Then move the "=" button back into position individually.
To complete the app, change the 'on mouseUp' code of the "=" button to the following:
on mouseUp
   put the value of field "display" into field "display"
end mouseUp
The term "value" refers to the evaluated (calculated) result of an expression. So, the code above simply replaces whatever expression is shown in the "display" field, with its evaluated result. For example, if the display field contained the text "1 + 2", the code above would replace that text with "3".
Try playing with the calculator app - it's now fully functional. Can you imagine how to add more advanced features to the app?
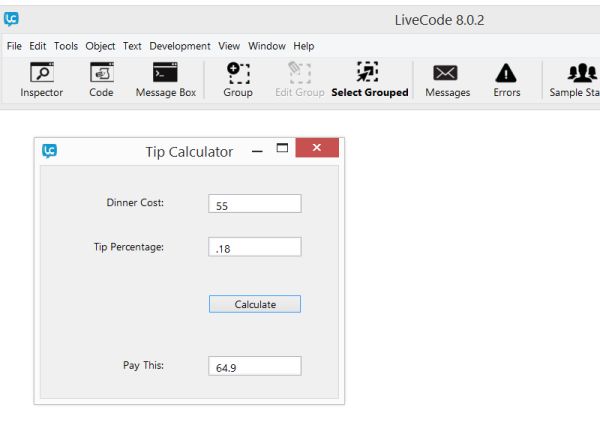
7. A Tip Calculator App
Create a new stack and edit the 'name' and 'title' properties to "Tip Calculator".
Drag 3 label controls onto the stack, and edit their 'contents' properties to "Dinner Cost", "Tip Percentage", and "Pay This".
Drag 3 text field controls onto the stack and edit their 'name' properties to "Field1", "Field2", and "Field3".
Drag a button control onto the stack, and arrange the controls so they look like this:
Be sure to save changes to your app. This author suggests saving incrementally numbered file names every time you make a major change/addition to your app layout or code (i.e., name consecutive files something like tipCalculator1.livecode, tipCalculator2.livecode, etc.). This habit can help you easily revert to previous states when app development goes in a bad direction.
Add the following code to the button's 'on mouseUp' handler:
on mouseUp
   put (the text of field "field1" * the text of field "field2" \
   + the text of field "field1") into field "field3"
end mouseUp
This code simply multiplies the dinner cost times the tip percentage, adds that value back onto the dinner cost, and displays the total in the third text field.
Notice the '\' character at the end of the first line of code above. It's used to split single lines of code onto 2 or more lines, whenever a single line is too long to read comfortably. Try erasing it and put all the code on a single line. You'll see that it works exactly the same.
A shorthand way of writing the code above is:
on mouseUp
  put fld field1 * fld field2 + fld field1 into fld field3  -- shorter
end mouseUp
Note that the text following the two dashes in the code above is called a 'comment'. Comments are human readable bits of text which are ignored completely by Livecode. They're used to clarify what a piece code does, for other people who read your code.
Run the Tip Calculator app now to see it in action. It should be mentioned that a simple calculation like this could be performed with the previous generic calculator, but one of the great things about apps is that you can design them to perform very specific tasks, which help to streamline the activities they enable, reduce potential input errors, protect pieces of data which shouldn't be edited by the user, etc. When creating apps for business, for example, controlling user input and data processing in that way is very important.
Can you think of some other types of apps which take values input by a user, perform specific calculations, and display the calculated results?
8. A To-Do List App
Create a new stack and drag a field, button, and scrolling list field control onto it. Edit the name property of the field to 'field1', the name and label of the button to 'Add', and the name of the scrolling list field to 'scroll1':
Add the following code to the button:
on mouseUp
   put (the text of field "field1" & cr) after field "scroll1"
   put empty into field "field1"
   focus field "field1"
end mouseUp
This code adds text from the text entry field, to the end of the scrolling list display. The "cr" represents a carriage return. The text in the entry field is then erased, and the cursor is focused there, so that the user can enter a new line of text.
Add this code to the scrolling list field:
on mouseUp
   put the hilitedlines of me into slct
   answer ("Really delete '" & line slct of me & "'?") \
   with "Yes" or "No"
   if it is "Yes" then
      delete line slct of me
   end if
end mouseUp
The first line of this code creates the new variable 'slct', to hold the index number of whichever line the user has selected ('hilitedlines'). The user is then asked if that line should be deleted. Notice that 'line slct of me' would, for example refer to the text of the second line, if the user had clicked on line 2 in the list. If the user responds yes to the question, then that line of the scrolling list field is deleted. This whole block of code, therefore, simply allows the user to click on items in the list to delete them. Try running the app to see the code in action.
Can you imagine some other uses for a list app like this (grocery list, contact list, appointment list, etc.)?

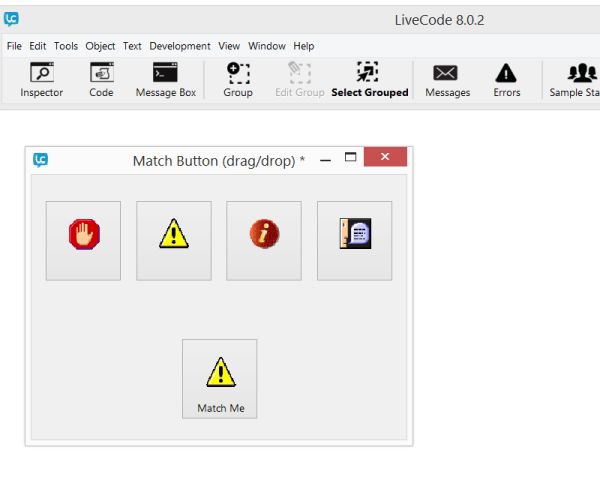
9. A Click/Drag Matching App
Create a new stack and drag a button control onto it. Edit the button's name property to "btn1", it's label to "Match Me", and then select any image for it's icon property (in the fifth pane of the property inspector).
Now add 4 more buttons to the stack. Set their label properties all to " ", and choose different icons for each button. These icons should all be different from one another, but one of them should be exactly the same as the 'btn1' icon. Try selecting the 4 buttons and use the 'align' and 'distribute' tools to lay them out in a neatly spaced line:
Add the following code to the script of the stack:
on mouseDown
   grab the target
end mouseDown
on mouseup
   if ((intersect(the target, btn btn1)) and \
   (the icon of the target is the icon of btn btn1)) then
      answer "Match!"
   end if
end mouseup
In this code, whenever the mouse is clicked, the 'grab' command allows the clicked object to be dragged around the screen. When the mouse button is released, a "conditional expression" is evaluated. The 'if' code structure evaluates whether a condition is true, then performs some action(s) based on that evaluation. In the evaluation above, the 'intersect' function is used to check if the grabbed button ('the target') is touching the 'btn1' button. If that's true, AND if the dragged button's icon matches the btn1 icon, then a "Match!" message is displayed.
Notice that the 'intersect' function above takes two 'parameters', enclosed in parentheses. 'Functions' in Livecode work just like commands you've seen so far. They just use the parentheses syntax to take some input data (and they'll often produce some 'return value' output).
Run the app and notice that some controls may visually overlap in ways that you don't intend. You can adjust the 'layer' property of each object to adjust which objects cover over others when dragged.
Try to think of some ways in which the code features of this app could be used to create more interesting games. Then, take a look at the maze, frogger, and matching games at https://sites.google.com/a/pgcps.org/livecode/home/livecode-links. You may be surprized to see how just a little creative thinking can turn the basic click/drag, intersect, and 'if/then' property evaluation techniques into a wide variety of other entertaining games. Practice your digital drawing skills and get ready to create the next app store hit!
10. Arrays, Loops, Chunks and Other Data Processing Tools
Every single thing a computer/device can do comes down to its ability to process 'data' of some sort. That data could be, for example, inventory prices in a business app, image and touch coordinates in a graphic game, binary sound data in a voice recorder app, hardware control codes in a robot automation app, etc. Really, all any computer can do is input, process, and output such data. Learning how various code structures are able to represent and manipulate every possible type of data a computer can effect, is largely what coding is about.
If you do any serious programming of any sort, you'll need to learn how to manipulate text data and how to manage complex data structures (rows and columns of data, potentially with sub rows and columns...). The examples in this section will introduce the tools required to deal with common types of data.
The code in this section can be entered into the Livecode message box in multi-line mode (press CTRL + ENTER to submit multiple lines of code), but this author's preference is to simply create a new stack with a button, and add the example code to the button's 'on mouseUp' handler. The editor, debug tools, save/load, and other features available in UI code windows are much better than those in the message box.
10.1 Arrays
Livecode uses 'arrays' to hold and manipulate everything from simple lists to 'multidimensional' tables (nested rows and columns) of data. You can create a simple list with a numbered index. This example creates a 'names[]' array with three elements (John, Tom, and Mary), numbered 1, 2, and 3. Notice that the numbered indexes are enclosed in square brackets:
put "John" into names[1]
put "Tom" into names[2]
put "Mary" into names[3]
put names[2]   -- displays the name "Tom"
You can also create a list with a 'keyed' (word) index. This example creates a 'food[]' array with 3 elements labeled "fruit", "veggie", and "meat", with values set to "apple", "lettuce", and "turkey" respectively:
put "apple" into food["fruit"]
put "lettuce" into food["veggie"]
put "turkey" into food["meat"]
put food["veggie"]    -- "lettuce"
put the keys of food  -- displays "fruit, veggie, meat"
'Multidimensional' arrays can be thought of as lists within elements of a list, or even tables within cells of a table, or any combination of such structures. The following example creates an 'employees[]' array to store info about several employees. It's not really complicated, just think of it as a list of 3 people, each of whom have 3 associated sub-lists of name, phone, and address info:
put "John" into employees[1][1]
put "123-2345" into employees[1][2]
put "1 Street Road" into employees[1][3]

put "Tom" into employees[2][1]
put "234-3456" into employees[2][2]
put "2 Road Lane" into employees[2][3]

put "Mary" into employees[3]["name"]
put "345-4567" into employees[3]["phone"]
put "3 Lane Street" into employees[3]["address"]

put employees[1][1]            -- "John"
put employees[3]["address"]    -- "3 Lane Street"
You can save and load simple arrays to/from a readable text file:
combine food using return and tab     -- this separates each element
put food into URL "file:myfood.txt"   -- onto a new line, and saves it

put URL "file:myfood.txt" into food   -- this loads it, then recreates
split food by return and tab          -- a new array element from
                                      -- every line item
put food["meat"]
More complex arrays should be saved to a binary (unreadable) file, using the arrayEncode() and arrayDecode() functions. Binary encoded arrays assure that data is always grouped and saved properly:
put arrayEncode(employees) into URL "binfile:mydata"   -- save
put arrayDecode(URL "binfile:mydata") into employees   -- load
put employees[2][2]
You can also save arrays (and the data in any other type of container) to a 'custom property' which gets saved with your stack:
global food

on closeStack
  set the myFood of this stack to food
end closeStack

on openStack
  put the myFood of this stack into food
  put food["meat"]
end openStack
10.2 Loops
'Loops' are most often used to 'iterate', or step through the items in a list, 1 by 1. In Livecode, loops begin with the word "repeat":
repeat 3 times
  answer "Annoying!"
end repeat

put 3 into nmbr
repeat with cntr = 1 to nmbr
  answer "Name " & cntr & ": " & names[cntr]     -- displays each name
end repeat                                       -- in the name array

repeat for each element foodname in food         -- displays each food
  answer foodname                                -- in the food array
end repeat

repeat for each element namekey in employees     -- loops through keys
  put namekey[1]                                 -- displays the name
  repeat for each element nameinfo in namekey    -- loops through the
    answer nameinfo                              -- items stored in
  end repeat                                     -- each key
end repeat
Note in the 'foreach' loops that a variable of your choosing is used to label each element throughout the iteration. The 'foodname', 'namekey', and 'nameinfo' variables could be labeled anything you choose. Also, the 'cntr' and 'nmbr' variables, which are incremented (1 is added to the count number each loop) in the iteration above, are also variable labels which can be named as you please.
10.3 Chunks and Text Manipulation
'Chunks' are Livecode's ingenious method of referring to pieces of text and data in any container:
put "4 score and 7 years ago our" into wrds
put the last word of wrds.    -- 'our'
put word 4 to 6 of wrds       -- '7 years ago'
put char 1 of word 3 of wrds  -- 'a'
select word 2 of line 5 of field "field1"
You can also use language such as "is in", "is not in", "contains", "is among", "is not among", "begins with", "ends with", and "number" to perform conditional operations with text:
put the number of lines in wrds

if "ago" is in wrds then
  answer "yes"
else
  answer "no"
end if
The functions length(), offset(), lineoffset(), wordoffset(), itemoffset() are also useful in dealing with chunks, loops, and arrays:
put length(wrds)

put length(wrds) into nmbr        -- this is how you iterate through
repeat with countr = 1 to nmbr.   -- a list of any length
  answer "Name " & countr & ": " & names[countr]
end repeat
You can write out list contents between parentheses, separated by comma delimiters, and parse them in code using chunks:
put ("10:0 PM", "6:22 AM") into alarms
put item 1 of alarms
This is a simple alternative to using arrays.
10.4 Conditional Evaluations
Stepping through a list of data, and performing a set of actions based on whether some condition exists with each item, is one of the most common techniques you'll see in code:
put ("10:00 PM", "6:52 AM") into alarms
repeat for each item tm in alarms
  if tm = the time then
     beep
     answer "It's " & tm & "!"
  end if
end repeat
Together, the tools demonstrated above enable the most fundamental techniques needed for all data processing you'll do in Livecode. In this tutorial, we'll explore array, loop, chunk, and text processing techniques by example.
11. A '99 Bottles of Beer on the Wall' App
Create a new stack, add a field named "field1", and change its 'vScrollbar' property to true (put a check in that property box). This adds a scroll bar so that large amounts of text can be easily scrolled.
Add the following code to the stack script:
on startup
   put "" into fld "field1"
   repeat with c = 100 down to 1
      put c & " bottles of beer on the wall.  " & \
      c & " bottles of beer.  Take one down, pass it around.  " & \
      (c - 1) & " bottles of beer on the wall."  & \
      cr after fld "field1"
   end repeat
   -- revSpeak (the text of fld "field1")  -- this line is optional
end startup
The 'on startup' handler runs the code when the app starts. The first line ensures that the field is empty. The 'repeat' loop counts backward from 100 to 1, with the variable "c" holding the current loop number on each iteration. The rest of the code simply concatenates the current loop number with the rest of the song lyrics, and puts that whole string of text at the end of ("after") field1.
For testing purposes, you can add a button with the label "sing", and the following code:
on mouseUp
   send "startup" to this stack
end mouseUp
The 'send' command sends a "startup" event to the stack, which is handled by the 'on startup' handler in the stack code. This causes the code above to execute as if the app had just started, every time the button is clicked. You can use the 'send' command to easily run code on other objects, instead of having to create a user command for shared code.

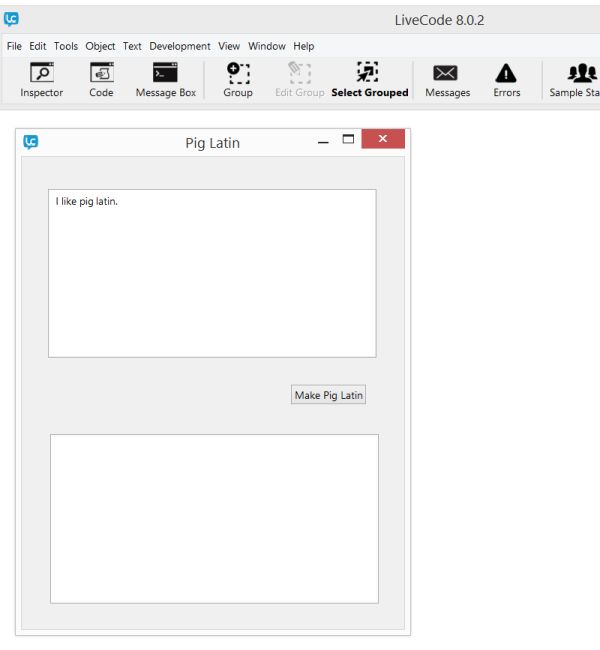
12. A Pig Latin App
Create a new stack with two fields named "field1" and "field2". Add a button labeled "Make Pig Latin" with the following code:
on mouseUp
   put "" into fld "field2"
   repeat for each word wrd in fld "field1"
      replace "," with "" in wrd
      replace "." with "" in wrd
      put the first char of wrd into firstchar
      if firstchar is in "aeiou" then
         put wrd & " hay " after fld "field2"
      else
         put char 2 to length(wrd) of wrd & " " & firstchar & "ay " \
         after fld "field2"
      end if
   end repeat
end mouseUp
The first line above clears field2 of any existing text. The following loop goes through each word in field1, eliminates commas and periods and then performs a conditional operation based on the first letter of each word. If the first character is a vowel, then the entire word, followed by " hay", are added to field2. Otherwise, if the first letter is not a vowel, the rest of the word (starting at the second letter), followed by the first letter and "ay", are placed into field2. Tada, pig latin!
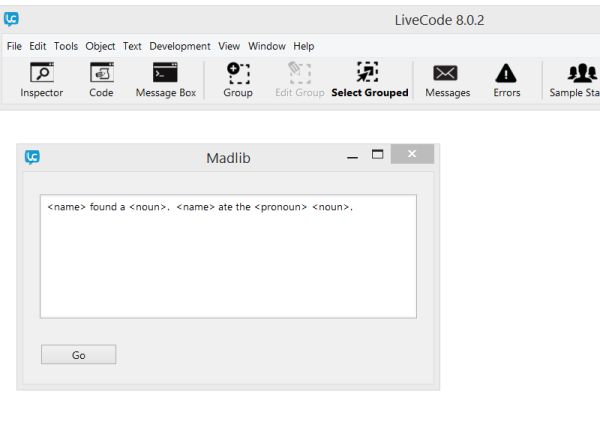
13. A Madlib App
Create a new stack, add a text field and a button. Edit the name property of the field to "field1" and resize it so that it can display several lines of text:
Add the following code to the script of the main stack:
on openStack
   put "<name> found a <noun>.  <name> ate the <pronoun> <noun>." \
   into field "field1"
end openStack
This code puts some default text into field1 when the program starts. The 'on openStack' handler is built into Livecode to do things when an app starts. Notice the format of the text above - several types of words, each enclosed in angle brackets, will be asked of the user. The words provided by the user will be replaced in the text, to create a funny madlib story. The user can edit the text to create their own madlib.
Add this code to the button:
on mouseUp
   repeat for each word wrd in field "field1"
      if wrd contains "<" then put wrd after wrds
      -- 'wrds' will hold a list of the originally bracketed words
   end repeat
   -- get rid of brackets and punctuation marks in the wrds list:
   replace "<" with " " in wrds
   replace ">" with " " in wrds
   replace "." with " " in wrds
   replace "," with " " in wrds
   -- eliminate duplicate words in wrds list:
   repeat for each word clean in wrds
      add 1 to cleanlist[clean]
   end repeat
   -- replace bracketed words in field1 with words chosen by the user:
   put the keys of cleanlist into wrdsclean
   repeat for each word clean in wrdsclean
      ask clean
      replace ("<" & clean & ">") with it in field "field1"
   end repeat
end mouseUp
The first loop above iterates through each word in field1. Any word which contains the character "<" is added to the end of the text contained in a new variable labeled 'wrds'. When the loop is done, all the '<', '>', '.' and ',' characters in the wrds list are replaced with spaces, so that only the words themselves are included (the 'replace' command is built into the Livecode language).
The next loop creates a list of unique words in the 'wrds' list (in the default text above, that list is reduced to only the 3 words "name", "pronoun", and "noun"), and those words are saved in the new variable 'wrdsclean'. The way this loop works is a bit complicated for the moment - it creates an array named cleanlist[], using each word as a key in the array. Since an array can only have unique keys, this process automatically eliminates any duplicate words. If you don't understand how that works, just move on and understand the key point that the loop iterates though the list of words and does something with each word (in this case creates a unique array element).
The final loop asks the user for a text entry for each word in the 'wrdsclean' list, then replaces the original bracketed words in the field, with the text entered by the user. At this point the madlib functionally is complete.
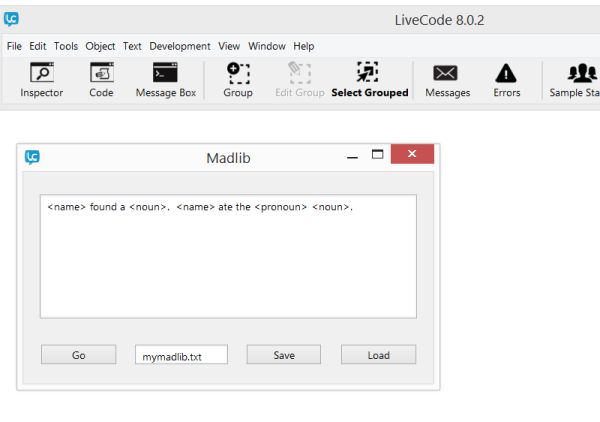
We can improve the app's functionality by adding save and load features. Add 2 more buttons to the app, with the labels "Save" and "Load". Add a text field named "field2" and edit its contents to "mymadlib.txt":
Add this code to the save button:
on mouseUp
   put field "field1" into URL ("file:" & field2)
   answer "Saved"
end mouseUp
Add this code to the load button:
on mouseUp
   put URL ("file:" & field2) into field "field1"
end mouseUp
You can see in the code above that the data from a field container can be put into a URL (file) container, and visa-versa, using the exact same code that you've become familiar with already, just like any other 'put' operation. You can send data to web site URLs and other useful containers just as easily. In our Madlib app, you can now edit the file name in field2 to save and load different versions of your own created Madlib texts.
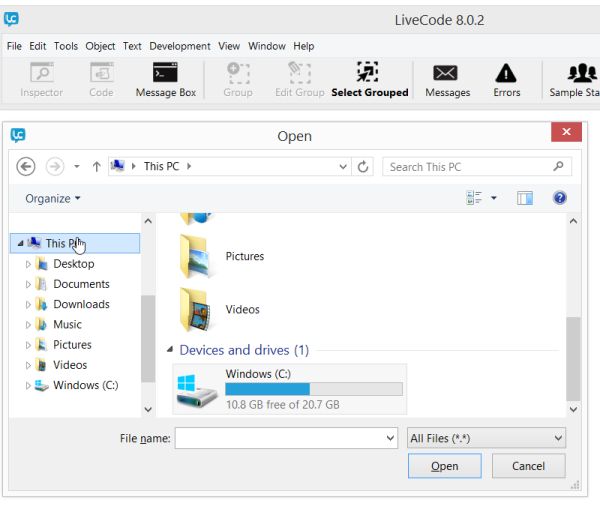
By the way, try running the following code in the message box to see another way of picking file names. You can search for "answer" in the Livecode dictionary to see how it works:
answer file "Choose a file..."
put it
Play a few Madlib games with some edited, saved and loaded text. Make up your own story with new bracketed word types!
14. A 'Time Between Dates' App
Create a new app with 3 label controls "Start Date", "End Date", and "Time Between", 3 field controls labeled "startdate", "enddate", and "timebetween", and a button labeled "Calculate". Use the group tools to distribute and align the controls like this:
Add the following code to the stack script, so that some default dates are added to the fields when the app starts:
on stackOpen
   put "5/27/1972" into fld "startdate"
   put "4/1/2016" into fld "enddate"
end stackOpen
Add the following code to the calculate button:
on mouseUp
   convert field "enddate" to dateItems
   convert field "startdate" to dateItems
   put (item 1 of field enddate - item 1 of field startdate) & \
   " years, " & \
   (item 2 of field enddate - item 2 of field startdate) & \
   "months, " & \
   (item 3 of field enddate - item 3 of field startdate) & " days, " \
   into field "timebetween"
end mouseUp
This code should be fairly self explanatory once you see how the 'convert' command works. It converts a date into all its components, the first 3 of which are year, month, and day numbers. The routine above simply subtracts each of those start date components from the same end date components, and displays the results in the 'timebetween' field. Use it to figure out how long you've been alive! Can you think of other types of apps which could make use of date and time values?

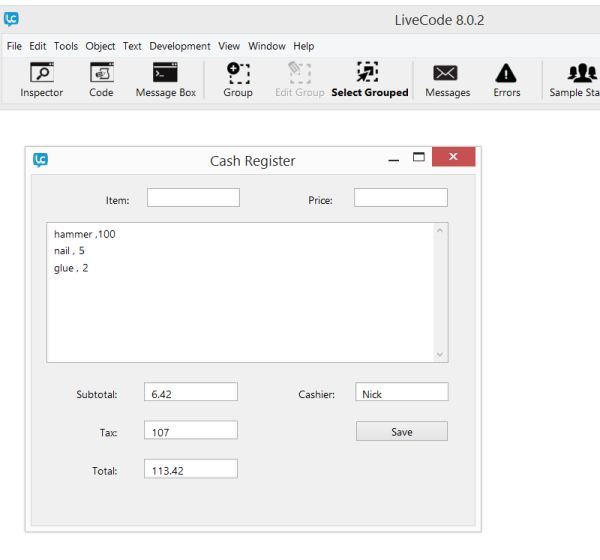
15. A Cash Register App
Create a new stack with user interface controls laid out like this:
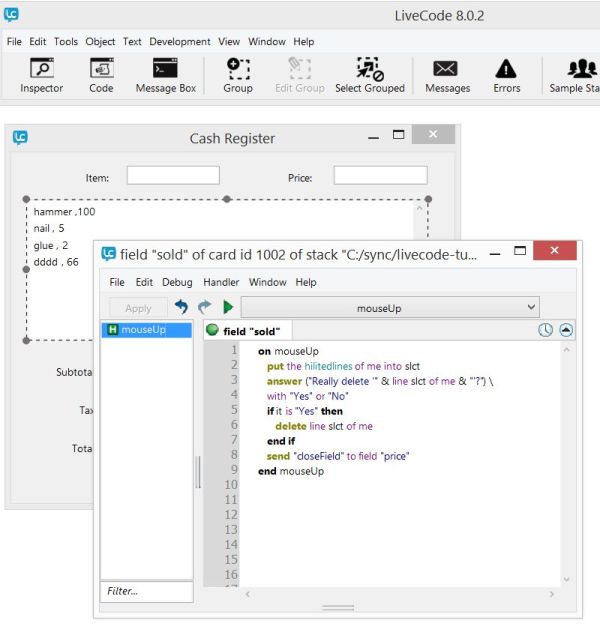
Name the small fields "cashier", "item", "price", "subtotal", "tax", and "total". Name the large scrolling list field "sold", and add this code to it:
on closeField
   if fld "price" is a number then
      put (fld "item" & " , " & fld "price" & cr) after fld "sold"
   end if
   put "" into fld "item"
   put "" into fld "price"
   focus fld "item"
   repeat for each line eachline in fld "sold"
      add item 2 of eachline to sbttl
   end repeat
   put sbttl into fld "subtotal"
   put sbttl * .06 into fld "tax"
   put sbttl * 1.06 into fld "total"
end closeField
The 'on closeField' handler is activated any time a field is left after being edited. The user can use the keyboard TAB key to jump between fields. The first 'if' evaluation checks to be sure that a number has been entered into the 'price' field. If so, the item and price values are added to the 'sold' list, the item and price fields are cleared, and the item field is refocused. The 'repeat' loop goes through each price (item 2) on each line in the 'sold' list, to add up a total sale amount. That amount, along with calculated tax and total amounts are displayed the appropriate fields.
Add this code to the 'sold' list:
on mouseUp
   put the hilitedlines of me into slct
   answer ("Really delete '" & line slct of me & "'?") \
   with "Yes" or "No"
   if it is "Yes" then
      delete line slct of me
   end if
   send "closeField" to field "price"
end mouseUp
You should recognize the majority of this code from the earlier 'to-do' app example. This code was copied from that app to allow the user to remove items from the sold list. The last line sends a 'closeField' event to the 'price' field, so that the total, tax, and subtotal values are recalculated and re-displayed after any item is removed from the list.
Add this code to the 'Save' button:
on mouseUp
  put the text of fld "sold" into saleData["sold"]
  put the text of fld "cashier" into saleData["cashier"]
  put the text of fld "subtotal" into saleData["subtotal"]
  put the text of fld "tax" into saleData["tax"]
  put the text of fld "total" into saleData["total"]
  put the date into datetm
  put "_" & the time after datetm
  replace "/" with "-" in datetm
  replace ":" with "-" in datetm
  replace " " with "" in datetm
  set the defaultFolder to "c:/4/"
  put arrayEncode(saleData) into URL ("binfile:" & datetm)
  repeat for each item fd in "item, price, subtotal, tax, total, sold"
     put empty into fld fd
  end repeat
end mouseUp
The first five lines create an array to hold all the sale data. The next five lines create a variable to hold the current date and time, in a format which can be safely used in a file name (the backslash and colon characters are replaced). Then the 'saleData' array is saved to a binary file, with the datetime file name. A loop is then used to clear all the necessary fields to begin a new sale.
This app is really not so complicated, but it demonstrates well how simple code can produce powerfully useful real life applications. Using this app as a foundation, you could add any number of features (automatic sales discounts on certain days, or for specific customer situations, error checks to ensure proper data entry etc.).
16. An HTML Calendar Generator and Viewer App
Create a new stack, add a field named "code", a button labeled "Make HTML", and a browser widget (by default named "browser"):
Add the following code (simplified from the example at http://livecode.byu.edu/internet/htmlEx.php):
on mouseUp
   put "May" into theMonth
   put 6 into StartDay
   put 30 into EndDate
   put 1 into curDate
   put theMonth & "<br>" & cr into theHtml
   put "<table border=" & quote & "1" & quote & ">" & \
   cr after theHtml
   repeat with Row = 1 to 6
      put "<tr>" & cr after theHtml
      repeat with Col = 1 to 7
         if (Row = 1 and Col < StartDay) or (curDate > EndDate) then
            put " " into Contents
         else
            put curDate into Contents
            add 1 to curDate
         end if
         put "<td>" & Contents & "</td>" after theHTML
      end repeat
      put cr & "</tr>" after theHtml
   end repeat
   put cr & "</table>" after theHtml
   put theHtml into fld "code"
   set the htmlText of widget "Browser" to theHtml
end mouseUp
This script generates some HTML table code using two nested repeat loops and a conditional evaluation which determines when new rows should be formed. An introduction to HTML coding is beyond the scope of this tutorial, but the methods used to concatenate (join together) the opening and closing < t r > (row) and < t d > (column) tags should be easy to follow. Notice in particular the if/then/else evaluation which determines the choice of items in each cell of the table layout. Once the HTML code is created, that code is put into the 'code' field, and the end result is made viewable in the browser by setting the 'htmlText' property of the browser widget. Try setting the variables in the beginning of the script to display a different month layout. If you know how to code HTML tables, try adjusting the size, padding, and other look/feel properties of the generated HTML.

17. A Freehand Paint App
Create a new stack named "Freehand Paint" with an image control named "image1" and 4 buttons:
Add the following handlers to each of the buttons respectively:
on mouseUp  -- freehand button
   choose the pencil tool
end mouseUp

on mouseLeave  -- image control
   choose the browse tool
end mouseLeave

on mouseUp
   choose the line tool
   set the penColor to "black"
   set the penHeight to 2
   set the penWidth to 2
   drag from random(400), random(400) to random(400), random(400)
   choose browse tool
end mouseUp

on mouseUp  -- clear button
   put empty into image "image1"
end mouseUp

on mouseUp  -- save button
   ask file "Save image as:" with "untitled.png" \
   with filter "PNG file, *.png"
   export image "image1" to file it as PNG with standard palette
end mouseUp
In the introduction of this text, it was mentioned that any operation a person can perform in the Livecode IDE, can be duplicated in code. You have the full power of the IDE available in your apps, controlled entirely by scripts! The 'Freehand' button code above performs the same action as if an IDE user had manually selected the pencil tool from the Livecode toolbar (allowing the user to draw). Because we only want that action to happen when the mouse is over the image, the 'on mouseLeave' handler of image1 ensures that the browse tool is re-selected whenever the user's mouse leaves the image. The 'Random' button effects the same action as a user clicking the line tool, setting the pen properties, dragging the mouse between two random end points, and then selecting the browse tool. The 'Clear' button simply empties the image1 data, to clear the drawing. The 'Save' button handler requests a file name from the user and then exports the image1 data, as a .png, and saves it to the chosen file. Can you think of how to add other features such as a color selector and other drawing tools?

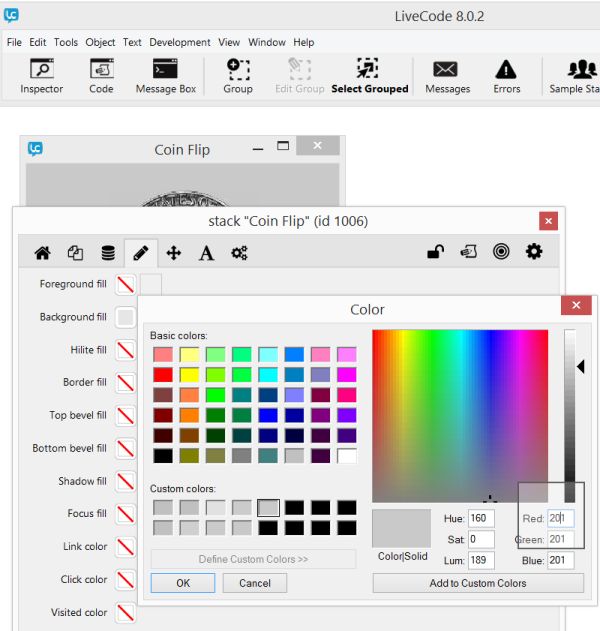
18. A Coin Flip App
Create a new stack with two image controls named "heads" and "tails", a field named "field1", and a button. Set both the width and height of each image to 159, uncheck the 'Show border' property of both images so that no line is shown around their edges, then line up the images so that one completely covers the other.
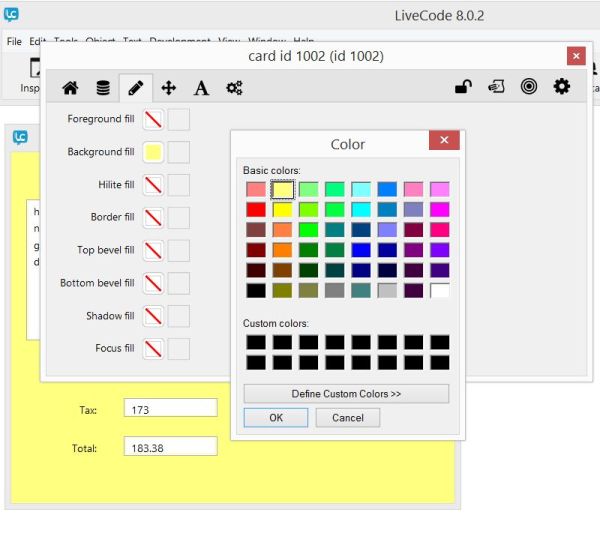
Edit the 'background fill' property of the stack, click 'Define Custom Colors', and set the red, green, and blue values all to 201. This will match the background color of the stack to that of the images we'll use in the app.
Add the following code to the stack script:
on stackOpen
   put url "http://live-code.net/heads.jpg" into image "heads"
   put url "http://live-code.net/tails.jpg" into image "tails"
   show image "heads"
   hide image "tails"
end stackOpen
This loads the images from an Internet URL, then hides the 'tails' image. Add this code to the button:
on mouseUp
   put item random(2) of "Heads, Tails" into fld "field1"
   if fld "field1" = "Heads" then
      hide image "tails"
      hide image "heads"
      wait for .5 seconds
      show image "heads"
   else
      hide image "tails"
      hide image "heads"
      wait for .5 seconds
      show image "tails"
   end if
end mouseUp
The 'random()' function selects either the first or second item from the list "Heads, Tails", and that random text selection is put into field1. The conditional if/else operation then chooses which image to display, based on the field contents, and a short delay is added to make the image blink, so that it's clear to the user that a flip has occurred (sometimes the image may stay the same, and this provides visual feedback that the flip operation is complete).
The images in this app are loaded from an online server. To remove that dependency, they could alternately be packaged as local files, together with your distributed app (there is an option in the standalone app settings which allows you to include external files). They could also be included in image controls on a second hidden card, and copied as needed. This would allow them to get compiled directly into your app.
Try to think of some other types of apps which could make use of the techniques here. Perhaps an image matching game, or a diagram maker (such as a guitar or ukulele chord diagram designer, etc.).


19. A Network Message Sender App
This next example will require creating two separate stacks. Create a new stack and
on openStack
   accept connections on port 1234 with message "clientConnected"
end openStack
on clientConnected pSocket
   read from socket pSocket with message "messageReceived"
end clientConnected
on messageReceived pSocket, pMsg
   write pMsg to socket pSocket
   read from socket pSocket with message "messageReceived"
end messageReceived


on mouseUp
   open socket to "localhost:1234" with message "clientConnected"
end mouseUp
on clientConnected pSocket
   write "hello" & return to socket pSocket
   read from socket sSocket until return
   put it
   close socket pSocket
end clientConnected
20. Learning To Create New Apps
At this point, you should be able to read/understand/alter a variety of existing Livecode examples. Any details about the Livecode language and IDE which you don't know or can't remember exactly (commands, handlers, syntax for loops and other code structures, patterns of use in the IDE, etc.) can be looked up in reference documentation. The Livecode dictionary is searchable, and has cross-referenced entries which help you find related topics about which you're unsure how to begin searching. The online lessons and forums can be searched by Google, and generally provide relevant answers and solutions to all the most common problems encountered in mainstream development. You'll continue to memorize and more intuitively recognize words and code structures which appear repeatedly in existing code.
So now is the time to focus on creating new apps from scratch. In this section of the tutorial, you'll learn a basic approach to getting started with new applications, and you'll read through several app histories to understand how the process evolved from original idea to final running code.
Keep in mind that in all but the simplest scripts, software generally never springs into being in its final form. It evolves and changes as it's created and used. Your first thoughts about what an app will look like, how it will behave, and how you will accomplish writing code to create it, will often go through stages as its features expand, and its usability is tested by humans. You may discover that people are able to break your app, or achieve unexpected results by using the interface in ways which you hadn't intended. If you're writing an app for other people who aren't familiar with software development, it's likely that their conception of how an app might work isn't detailed enough (often, not even really fully formed), or could be approached in a more streamlined way that is obvious to an experienced developer. A basic approach to turning imagined ideas into code will help begin the process of creating a working piece of software.
20.1 Prototyping and Pseudo Code
The first thing to do is imagine the user interface layout and the actions that a user will take when interacting with your app. This will provide a starting point to begin thinking about the data which will be input be the user, how it will be processed. and how the output will be displayed. In a game, that input may be as simple as the user moving a graphic around the screen, and the data processing may simply involve conditional evaluations which are performed when graphics collide (score numbers increase, other graphics' coordinates change, etc.). In a business app, the input may be columns of numbers upon which calculations are performed, fields of text which are sorted, searched, altered, saved/loaded, and otherwise manipulated to create a report, for example. In either case, starting with a UI layout helps to get the process started.
Livecode makes it easy to begin drawing screens, but you could even start your first stage by sketching a storyboard, flowchart, or screen layout(s) with pencil and paper. During the initial prototyping (drawing) stage, think about every piece of data the program will need to make your screen layout function. Will your game need to keep a list of image locations, user movement inputs, timer values, speed and score values, etc.? Will your business app need to read numbers from a local file, or an online database, or combine values from several fields in the UI? Look at your screen drawing and write down every piece of data that you can imagine will be dealt with by your app. Placing a scoreboard in your game drawing will help you think about that bit of data, and should likely start a chain of thought about where the on-screen value(s) will come from. Write down a list of all the other associated pieces of data which are needed to compute any such value(s) that come to mind. Think about the 'hidden' values which are needed to perform any operation in your app - perhaps the state tax percentage needed to calculate the total sale in a cash register app, or the list of coordinates of moving images in a game, etc. Will you need a way for users to select and save values, will there be some conditional evaluation which selects values, etc.? For example, for a sales tax value, perhaps a drop down list of states could be provided to the user, the selected result of which is used to choose an associated percentage value from an array, which is then saved in a file or custom property, which can be loaded every time the app starts. Not only will this little piece of data require more screen layout (drop down selector), but also more associated data (state list, file name, etc.), and more functionality that will need to be added to your code (routines to select, save, and load the associated state list, the chosen zip code, etc.). Even the simplest little data point and feature details in an app may require many lines of code!
Remember, everything that your app can do will be represented as some form of data. Think of how any input from the user will be saved as data values, how those values will be processed by your app, and how that data processing will lead to output in your app. You'll need to come up with your own ways of managing lists and tables of values using arrays. For example, if you're creating a calendar app, how do you store repeating events, alarm times, etc.? There is no absolutely definitive answer to this question, and if you look through the code of 10 different calendar apps, you'll likely find 10 different solutions. When processing large amounts of data, you'll need to think of the most efficient ways to access and manipulate values, without wasting processing power and speed, using the smallest lists possible (for example, key/index lists which represent large chunks of data, instead of the entire chunks themselves). You'll have to weigh the benefits and drawbacks of using files compared to database systems for information storage/retrieval. A database provides multi-user access to data and can deal with large volumes of information without as much thought required to manage performance, but it does require additional setup, or perhaps an available Internet connection on the user's machine, and different patterns of coding thought which can affect how you set up data structures throughout your app. Because programming is ultimately about processing data, getting all the required data representations and structures clearly organized is one of the most important parts of the coding process.
As you sketch your app layout and define the data required, you can naturally begin to imagine the code structures which will bring the data processing to life. Data will be stored in variables, saved and retrieved to/from containers, calculations will be performed upon numbers, text strings will be concatenated, the results of conditional operations will be performed, lists of data will be processed using loops, etc. You'll need to imagine and create those structures using your own creative approach, based upon previous examples you've seen. Often, there will be several ways to accomplish the same goal. The process will become intuitive with experience, as you see more of the available Livecode solutions in use, but good planning and thoughtful design will always be part of the approach. In the beginning, write down variable names and list the other data containers you'll need to use in the app (will you store data in files, URLs, custom properties, etc.?). Write out how you plan to use loops to step through lists of data, the types of if/then conditional evaluations you expect to perform, etc.
Up to this point in the tutorial you've been shielded from the design choices which go into building an app. All you've needed to do is understand how the IDE and code examples work in each finished project. From this point on, and as you create apps from scratch on your own, you'll need to think about the natural design choices which confront developers at every stage of building any app.
One way to get started with actual coding is to use 'pseudo code', or plain English descriptions of what should happen in your code. Write out what you want to happen when a certain condition arises. This will naturally lead to thoughts about specific Livecode commands, event handlers, user created functions, and other actual code structures. Put comments in an event handler of a button in your UI layout, for example, explaining what you want that button to do when clicked. Put dummy table data into a grid control, and add comments about where/how that table of data will be obtained. Flesh out the imagined functionality of your app by thinking about what each piece of code needs to do. By using pseudo code descriptions of what you want the code to do, you can work in a top-down way, keeping the overall design of the project in mind without getting caught up in the hairy details of getting every line of code to work properly. It's easy to lose sight of the overall plan when you're lost in the miniscule details of writing code. Try to get as much of the complete design and overall logic done before you begin writing code. You'll get better at thinking directly with code, and need less pseudo code as you gain more experience, but it's always best to plan out the visual layout, the required data values/structures, and the code structures that you imagine will flesh out all the actions which your app will require to operate.
Read the following case studies to see how the general approach above yields results. In every case, pay attention to the fact that each feature of any app is a design decision determined by necessity, implementation difficulty, and other factors which could all be solved by a number of alternate layout and code structure choices.
21. Case Studies
(The tutorial is being actively updated. Check back regularly for new case study examples)